코드상으로 직접 사용해보면서 알아보자.
constructor부터 알아보자. constructor는 컴포넌트가 처음 만들어질 때 호출되는 함수이다. props를 파라미터라 받아오고 super(props)를 해주는데 이 용도는 컴포넌트를 만들게 될 때 리액트에서 불러온 컴포넌트를 extends하고 이것을 상속하는데 컴포넌트가 원래 가지고 있던 생성자 함수를 먼저 호출해주고 사용자가 하고싶은 작업을 하는 것이다.
아래와 같은 코드를 작성하면 개발자 도구에서 constructor이 호출된다.
import React, { Component } from 'react';
import MyComponent from './MyComponent';

class App extends Component {
  constructor(props) {
    super(props);
    console.log('constructor');
  }

  render() {
    return (
      <div>
        <h1>안녕하세요 리액트</h1>
      </div>
    );
  }
}

export default App;
그리고 componentWillMount라는 API가 있는데 v16.3이후부터 사라져서 무시하고 넘어가자.
다음으로 componentDidMount()라고 있는데 외부 라이브러리를 연동을 하거나 컴포넌트에서 필요한 데이터를 요청하거나 예를들어 Ajax, GraphQL 요청을 한다던지 하거나
DOM에 관련된 작업 스크롤 설정, 크기 읽어오기같은 작업을 한다던지 아니면 특정 DOM에다가 이벤트를 등록할 때 그러한 작업을 할 수 있다.
아래와 같이 코드를 작성해보자. 그러면 constructor이 먼저 호출되고 난 후에 componentDidMount가 호출이 된다.
import React, { Component } from 'react';
import MyComponent from './MyComponent';

class App extends Component {
  constructor(props) {
    super(props);
    console.log('constructor');
  }
  componentDidMount() {
    console.log('componentDidMount');
  }
  render() {
    return (
      <div>
        <h1>안녕하세요 리액트</h1>
      </div>
    );
  }
}

export default App;
특정 DOM에다가 어떠한 작업을 하고 싶으면 ref라는 것을 사용하는데 조금 알아보면 ref라는 것은 DOM에다가 id를 붙여주는 것과 비슷한데 DOM에 대한 레퍼런스를 가져올 수 있다. ref를 사용해서 코드를 작성하고 개발자 도구를 키면 실제 값들을 볼 수가 있다.
import React, { Component } from 'react';
import MyComponent from './MyComponent';

class App extends Component {
  constructor(props) {
    super(props);
    console.log('constructor');
  }
  componentDidMount() {
    console.log('componentDidMount');
    //추가
    console.log(this.myDiv.getBoundingClientRect());
  }
  render() {
    return (
    //추가
      <div ref={(ref) => (this.myDiv = ref)}>
        <h1>안녕하세요 리액트</h1>
      </div>
    );
  }
}

export default App;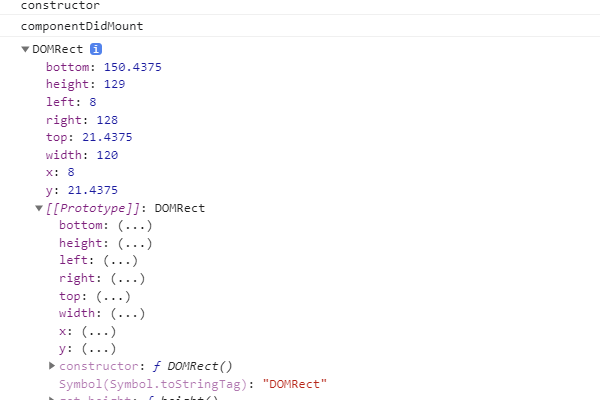
.height를 넣어주어 값을 바로 확인할 수도 있다.
console.log(this.myDiv.getBoundingClientRect().height);
다음으로 컴포넌트가 업데이트 될 때 호출되는 라이프사이클 API를 보자.
이전에는 componentWillReceiveProps가 있었는데 v16.3이후부터는 쓰지 않게 되었다.
대신에 getDerivedStateFromProps()라는게 생겼는데 이건 사용법이 좀 다르다. this.setState를 하는게 아니라 바로 객체를 리턴하는 식으로 동작한다. 객체를 리턴해주면 객체값이 state로 들어가지게 되고 LifeCycle API는 업데이트 되는 과정에서도 사용이 되지만 컴포넌트가 만들어지는 과정에서도 사용이 된다. 즉 API를 테스트 하기 위해서 codesandbox에서 MyComponent.js를 만들어서 코드를 작성해보자.
MyComponent에서 props값과 state값을 보여주게 하고
import React, { Component } from 'react';

class MyComponent extends Component {
  state = {
    value: 0
  };
  render() {
    return (
      <div>
        <p>props: {this.props.value}</p>
        <p>state: {this.state.value}</p>
      </div>
    );
  }
}

export default MyComponent;
app컴포넌트에서 불러와준다.
import React, { Component } from 'react';
import MyComponent from './MyComponent';

class App extends Component {
  constructor(props) {
    super(props);
    console.log('constructor');
  }
  componentDidMount() {
    console.log('componentDidMount');
    console.log(this.myDiv.getBoundingClientRect().height);
  }
  render() {
    return (
      <div ref={(ref) => (this.myDiv = ref)}>
        <h1>안녕하세요 리액트</h1>
        <MyComponent value={5} />
      </div>
    );
  }
}

export default App;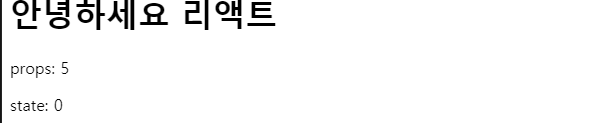
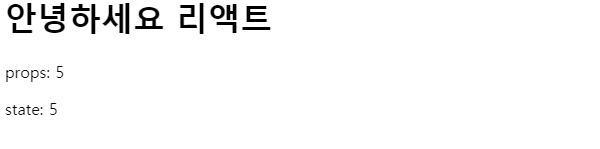
이제 getDerivedStateFromProps()를 넣어주는데 static값으로 넣어주어야 한다. nextProps, prevState값을 파라미터로 가져온다. nextProps는 다음으로 받아올 props값을 가져오는 거고 prevState는 업데이트 되기전에 상태를 가져오는 것이다. 아래코드를 보자.
만약 prevState와 nextProps의 value가 다르면 return 해서 value값을 nextProps.value해서 넣어주면은 값이 같아지게 된다.
import React, { Component } from 'react';

class MyComponent extends Component {
  state = {
    value: 0
  };

  static getDerivedStateFromProps(nextProps, prevState) {
    if (prevState.value !== nextProps.value) {
      return {
        value: nextProps.value
      };
    }
    return null;
  }
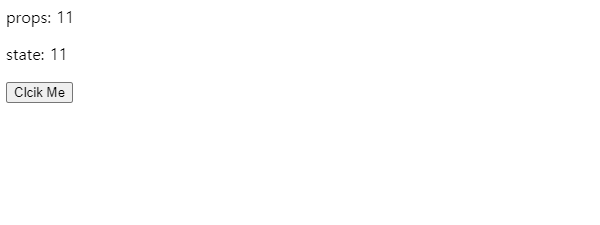
props값에다가 변화를 줬을 때 state값이 어떻게 되는지 살펴보자. app쪽에 state를 맡겨준다. 값 이름은 counter로 하고 값은 1로 해준다.
그리고 밑에 전달해주는 값을 this.state.counter로 해주고 button만들어주고
handleClikck 함수하나 만들어서 this.setState해서 counter 값은 this.state.counter + 1로 만들어준다. 그리고 handleClikck 함수값을 버튼에다가 onClick해준다.
이렇게 해주고 나면 버튼이 눌러지면 props 값이 바뀌고 props값이 바뀜에 따라 state도 바뀌게 된다.
import React, { Component } from 'react';
import MyComponent from './MyComponent';

class App extends Component {
  state = {
    counter: 1
  };

  constructor(props) {
    super(props);
    console.log('constructor');
  }

  componentDidMount() {
    console.log('componentDidMount');
  }

  handleClick = () => {
    this.setState({
      counter: this.state.counter + 1
    });
  };

  render() {
    return (
      <div>
        <MyComponent value={this.state.counter} />
        <button onClick={this.handleClick}>Clcik Me</button>
      </div>
    );
  }
}

export default App;
static getDerivedStateFromProps(nextProps, prevState) {
if (prevState.value !== nextProps.value) {
return {
value: nextProps.value
};
}
return null;
}다음으로는 컴포넌트의 업데이트 성능을 최적화 해주는 shouldComponenntUpdate에 대해서 알아보자.
shouldComponenntUpdate의 경우에는 다음 받아올 props와 다음 받아올 state값을 파라미터로 가져온다.
그래서 return false를 하게되면 업데이트를 안하게 되고 return true를 하게되면 업데이트를 하게된다.
shouldComponenntUpdate를 따로 구현하지 않는다면 기본적으로 return true라는 함수가 설정이 되고 특정로직에 따라 false를 반환하게 끔 하면은 특정상황에 최적화를 해줄 수 가 있다. 즉 shouldComponenntUpdate는 업데이트를 막아주는 함수라고 기억하면 된다.
코드를 작성해보자. shouldComponentUpdate라는 함수를 만들고 nextProps와 nextState를 받아오도록 한다.
그리고 특정조건을 넣어주는데 만약에 nextProps값이 10이면 return false를 하게하고 아니면 return true를 하게 하는 것이다. 그러면 클릭을 했을 때 값이 10이 되면 skip이 된다.
즉 조건이 만족해도 값만 바뀌고 렌더링을 하지 않는것이다. 특정조건에 따라 렌더링을 막아주는 함수라고 알고있자.
shouldComponentUpdate(nextProps, nextState) {
if (nextProps.value === 10) return false;
return true;
}
componentWillUpdate라는 것도 있는데 v16.3 이후에는 더 이상 사용하지 않는다.
다음으로 getSnapshotBeforeUpdate()가 있는데 getSnapshotBeforeUpdate()는 컴포넌트가 업데이트 되서 브라우저의 DOM에 반영되기 직전에 호출되는 함수이다. 업데이트 되기전에 DOM 상태를 리턴시켜서 리턴된 값을 componentDidUpdate에서 받아올 수가 있다.
아래의 예제코드를 보자. getSnapshotBeforeUpdate사용하게되면은 스크롤위치와 스크롤 크기를 가져와서 값을 리턴하고 나면은 componentDidUpdate에서 세번째 파라미터로 받아와서 값에 따라 list의 스크롤 위치를 설정함으로써 브라우저상에서 보고있는것이 버튼을 클릭해도 유지할 수 있게 끔 해줄 수가 있다.
현재의 상태와 이전의 상태가 다를 때 현재 리스트의 scrollTop scrollHeight값을 읽어와서 return처리를 하게되면은 나중에 componentDidUpdate에서 세 번째 파라미터로 받아올 수 있고 그 값을 가지고 필요한 작얼을 할 수 있다.
getSnapshotBeforeUpdate(prevProps, prevState) {
// DOM 업데이트가 일어나기 직전의 시점입니다.
// 새 데이터가 상단에 추가되어도 스크롤바를 유지해보겠습니다.
// scrollHeight 는 전 후를 비교해서 스크롤 위치를 설정하기 위함이고,
// scrollTop 은, 이 기능이 크롬에 이미 구현이 되어있는데,
// 이미 구현이 되어있다면 처리하지 않도록 하기 위함입니다.
if (prevState.array !== this.state.array) {
const { scrollTop, scrollHeight } = this.list;
// 여기서 반환 하는 값은 componentDidMount 에서 snapshot 값으로 받아올 수 있습니다.
return {
scrollTop,
scrollHeight
};
}
}
componentDidUpdate(prevProps, prevState, snapshot) {
if (snapshot) {
const { scrollTop } = this.list;
if (scrollTop !== snapshot.scrollTop) return; // 기능이 이미 구현되어있다면 처리하지 않습니다.
const diff = this.list.scrollHeight - snapshot.scrollHeight;
this.list.scrollTop += diff;
}
}
이어지는 componentDidUpdate의 경우에는 위에서도 봤지만, component가 실제로 업데이트 되고 난 다음에 호출되는 부분이다. provProps와 prevState 업데이트 되기 전의 값들을 확인해 줄수 있는데 특정 props가 바뀌면 어떠한 작업을 하게끔 해줄 수가 있다.
아래와 같이 componentDidUpdate를 구현해보자. 아래코드를 구현하면 클릭했을 때 개발자도구 콘솔 쪽에 value 값이 바뀌었다라는 문구가 나온다.
  static getDerivedStateFromProps(nextProps, prevState) {
    if (prevState.value !== nextProps.value) {
      return {
        value: nextProps.value
      };
    }
    return null;
  }
  shouldComponentUpdate(nextProps, nextState) {
    if (nextProps.value === 10) return false;
    return true;
  }
componentDidUpdate(prevProps, prevState) {
if (this.props.value !== prevProps.value) {
console.log('value 값이 바뀌었다!', this.props.value);
}
}
// 개발자도구 console창
// value 값이 바뀌었다! 2
다음으로 컴포넌트 제거 componentWillUnmount라는 것이 있다. 컴포넌트가 불필요해지면 컴포넌트가 사라지 데
그때 나타나는 함수이다.
componentDidUpdate(prevProps, prevState) {
if (this.props.value !== prevProps.value) {
console.log('value 값이 바뀌었다!', this.props.value);
}
}
componentWillUnmount() {
console.log('Good Bye');
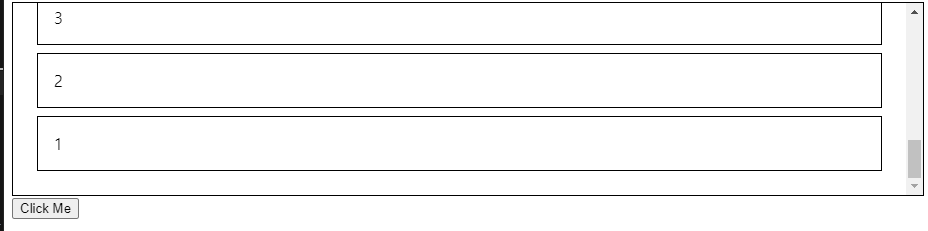
}this.state.counter가 10일 때만 보여지게 끔 하는 코드를 app.js에 작성한다. 클릭했을 때 값이 10이되면 사라지게 되고 콘솔창에 Good Bye가 나타나게 된다. 즉 MyComponent에서 componentWillUnmount가 실제로 사라지게 될 때(값이 10이되어서 사라질때) componentWillUnmount함수가 호출 되는 것이다.
  render() {
    return (
      <div>
        {this.state.counter < 10 && <MyComponent value={this.state.counter} />}
        <button onClick={this.handleClick}>Clcik Me</button>
      </div>
    );
  }
}

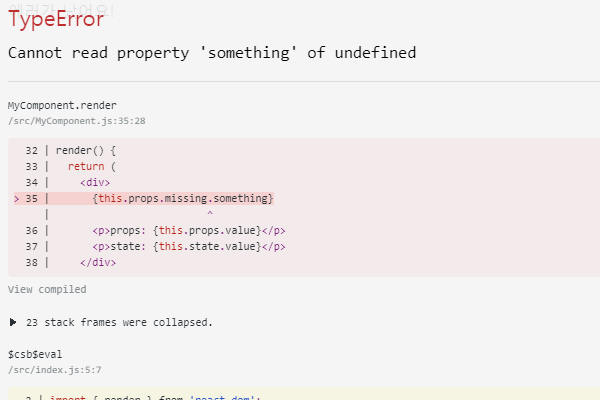
컴포넌트에 에러가 발생했을 때 사용하는 componentDidCatch라는것이 있다. 어떤 용도로 사용될까?
예를 들어 MyComponent에 아직 전달하지 않은 값이 있는데 (missing을 예를 들어서 사용) 객체인줄 알고 something을 보여주게 되면은 없는 것을 보여주니까 에러가 발생하게 된다. 즉 missing값이 undefined인데 something값을 어떻게 불러올 거냐 라고 에러가 뜨게 된다. 이러한 에러를 처리해 줄수 있는 것이 componentDidCatch라는 것이다.
  render() {
    return (
      <div>
        {this.props.missing.something}
        <p>props: {this.props.value}</p>
        <p>state: {this.state.value}</p>
      </div>
    );
  }
}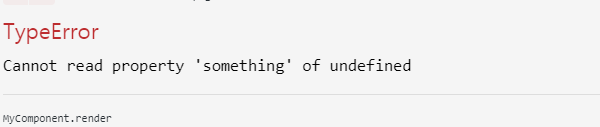
에러가 지금 MyComponent에서 발생하고 있는데 에러를 잡는 것은 부모 컴포넌트인 App.js에서 사용한다.
app컴포넌트에 componentDidCatch라고 하고 파라미터 쪽에는 error값과 info를 받아온다.
error쪽에는 어떠한 에러가 발생했는지 알려주는 것이고 info쪽에는 에러가 어디서 발생했는지 알려주는 것이다. 이러한 정보를 네트워크 통해서 특정서버에 전달을 해줄 수 있고 단순히 에러가 발생했다고 보여줄 수 있다.
즉 실수로 잡지 못했던 버그들을 잡아주는 것이다. 사용자한테는 앱이 팅겼을 때 오류를 해결하기 위해서 어떠한 메세지를 보여주고 에러정보를 실제 개발자들이 볼 수 있게 해주는 작업을 하는 것이다.
  componentDidCatch(error, info) {
    console.log(error);
    console.log(info);
  }

  // app.js
즉 error라는 값을 state에 넣어주고 아래 코드를 작성해주면 '에러가 나타났어요'라고 나타나게 된다.
import React, { Component } from 'react';
import MyComponent from './MyComponent';

class App extends Component {
  state = {
    counter: 1,
    error: false
  };

  componentDidCatch(error, info) {
    this.setState({
      error: true,
    });
    // API 를 통해서 서버로 오류 내용 날리기
  }


  render() {
    if (this.state.error) {
      return <div>에러가 났어요!</div>;
    }
    return (
      <div>
        {this.state.counter < 10 && <MyComponent value={this.state.counter} />}
        <button onClick={this.handleClick}>Clcik Me</button>
      </div>
    );
  }
}

주의할 점은 componentDidCatch를 사용할 때 에러가 발생할 수 있는 컴포넌트의 부모 컴포넌트에서 구현을 해줘야 한다.
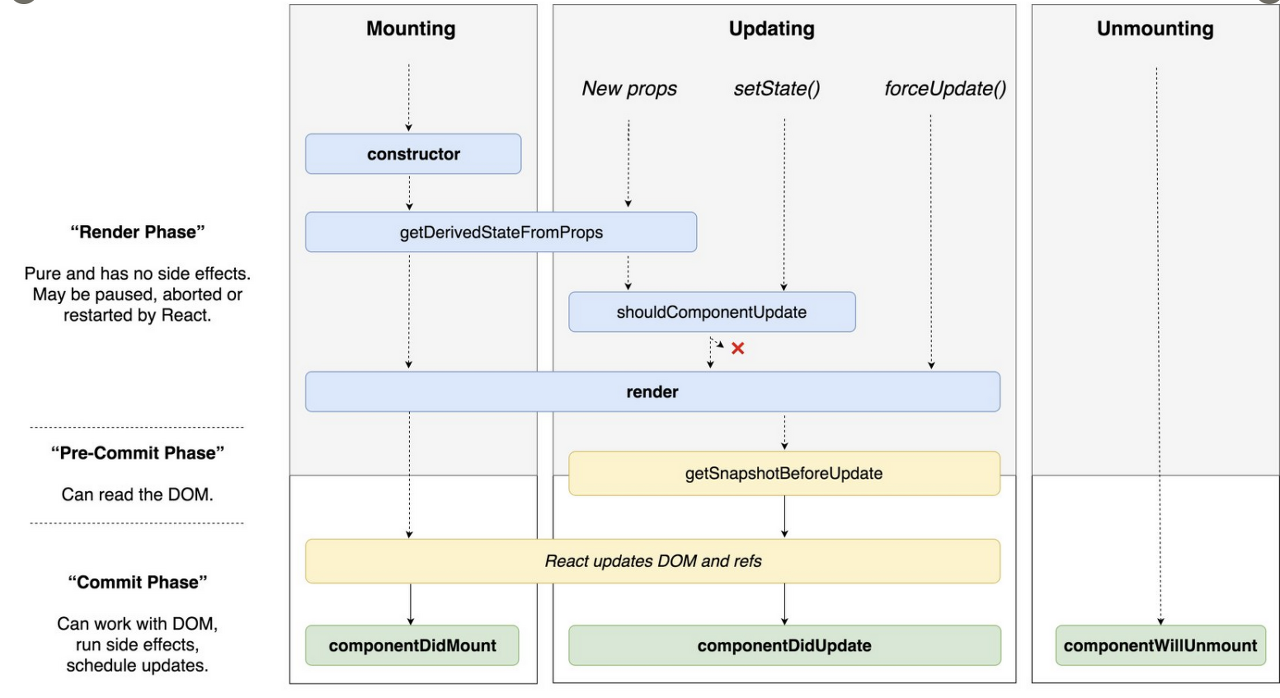
컴포넌트 라이브사이클 API 굉장히 종류가 많은데 다시 리뷰해보면
컴포넌트가 새로 만들어질 때 constructor가 호출되는 것이고
getDerivedStateFromProps는 props값을 state와 동기화 시키고 싶을 때 사용하는 것이고
shouldComponentUpdate는 컴포넌트가 업데이트 할지말지 정하는 것이고 false가 되면 아래가 호출되지 않고 true가 되면 아래가 쭉 호출된다. render하고 나서 getSnapshotBeforeUpdate는 실제로 브라우저에 반영되기 직전에 값을 확인해줄 수 있는 것이고
Mount가 끝나면 componentDidMount Update가 끝나면 componentDidUpdate 마지막으로 Unmount가 될 때는 componentWillUnmount가 호출 된다는 것과 추가적으로 componentDidCatch를 사용해서 에러가 발생한다면 잡아줄 수 있다는 것까지 기억해두자.
<출처 : velopert(김 민준) 누구든지 하는 리액트: 초심자를 위한 react 핵심 강좌>
https://www.inflearn.com/course/react-velopert/dashboard
누구든지 하는 리액트: 초심자를 위한 react 핵심 강좌 - 인프런 | 강의
리액트를 누구든지 쉽고 재밌게 시작 할 수 있도록 만들어진 강좌입니다., React 핵심 강좌 초심자를 위한 리액트(React) 핵심 강좌입니다. 만약에 여러분이 리액트를 배우고 싶은데, 아직 뭐가 뭔
www.inflearn.com
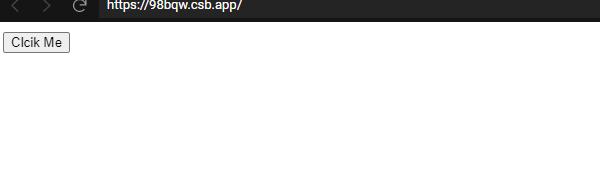
https://codesandbox.io/s/484zvr87ow
getSnapshotBeforeUpdate 예제 - CodeSandbox
getSnapshotBeforeUpdate 예제 by velopert using react, react-dom, react-scripts
codesandbox.io
https://codesandbox.io/s/reactanyone-lifecycle-api-forked-98bqw?file=/src/MyComponent.js
ReactAnyone-LifeCycle API (forked) - CodeSandbox
ReactAnyone-LifeCycle API (forked) by kjh950601 using react, react-dom, react-scripts
codesandbox.io
'React > velopert_react' 카테고리의 다른 글
| 배열에 데이터 삽입하기(배열 데이터 렌더링 및 관리) (0) | 2021.08.20 |
|---|---|
| Input 상태 관리하기 (0) | 2021.08.19 |
| LyfeCycle API 소개 및 사용법 ⅰ (0) | 2021.08.19 |
| State 사용방법 (0) | 2021.08.18 |
| Props 사용 방법 (0) | 2021.08.18 |